Windows Registry FAQ and HowTo Tutorial
The intention of this tutorial is to introduce the rather complex Windows Registry subject to the average user. We will illustrate it with screenshots and meaningful howto examples, followed by a Frequently Asked Questions section. All chapters refer to Windows 7, 8.1, Vista, XP, Server 2003, 2000, and Windows 10.
What is the Windows Registry?
The Windows Registry is a special place where Windows stores configuration settings for device drivers, applications, system services, the Windows Desktop and the user interface. The settings are stored in a tree-structured database across several files that are hidden from the user. However, Windows includes an editor application called Registry Editor (Regedit), which allows users to audit, import, and export the contents of the Windows Registry.
A short history of the Windows Registry.
Before the Windows Registry, both program applications and system components stored settings in special text files with the extension ini. For example, one important Windows settings file, system.ini, was located in the Windows folder. Text editors like Notepad or GetDiz could (and still can) open and edit .ini files. The main advantage of .ini files was that you could easily move application and system settings between different computers. The main disadvantage was the risk of data inconsistencies if two applications wrote to the same .ini file at the same time. There was also no provision for multi-user support.
Both problems could be solved while keeping .ini files, but Microsoft has decided against it. The original Registry was created in Windows 3.1 to store settings for COM (inter-process communication) components. With the introduction of Windows 95, it extended the use of this database to replace the .ini files. The new database offered a separate section for each user, and also separated system and application settings while still storing them in a central place. Windows 2000 improved Registry access performance by defragmenting and indexing the Registry. This is still the case for Windows 2003, XP, Vista and 7.
The intentions behind the Windows Registry were good, but the concept had not been completely thought through. System components and applications began writing enormous amounts of data to the Registry. It's not uncommon for an application installer to read and write a thousand values to the Registry during setup. This is one of the reasons why installing and uninstalling programs can take minutes on Windows compared to few seconds on most other operating systems. Some programs make constant reads and writes to the Registry during normal operation, which can slow down the entire system and even prevent the hard drive from going into low power mode.
Another problem with the Registry (as opposed to .ini files) is the difficulty of transporting program settings from one computer to another. It can be done, but is often rather difficult, as applications tend to spread their settings over different section of the Registry database. This also makes it more difficult to use applications on the go (on a USB stick), as portable applications must be independent of the Windows Registry. This is why some applications (for example the bookmark manager Linkman) offer the option of using an .ini file. All in all, the Windows Registry is a case of good intentions gone awry. It is slow, bloated and error prone.
Even a small Registry error can prevent Windows from loading the Desktop. Several of the common boot errors are related to faulty Registry values. For example the 0x0000007B Inaccessible Boot Device Blue Screen is caused by a missing device driver path in the Registry (we are preparing a follow up tutorial on this subject). This is why every Windows user should know at least the basics about the Windows Registry.
How to backup and restore the Windows Registry.
Where are the Windows Registry database files located?
The Windows Registry is spread across different folders, in data files which are hidden by Windows. These files are hidden directly by the kernel and file system. Still, if you are very curious, you can make them visible. The registry files can be seen if you access your current hard drive from another Windows installation.
The easiest way to do this is to take the hard drive or solid state drive (SSD) out of your computer and put it in an external USB or eSATA case. Now, if you connect the hard drive to another computer (like a notebook) and browse to the folders where the Registry files are located, they will be visible.
 In all Windows versions.
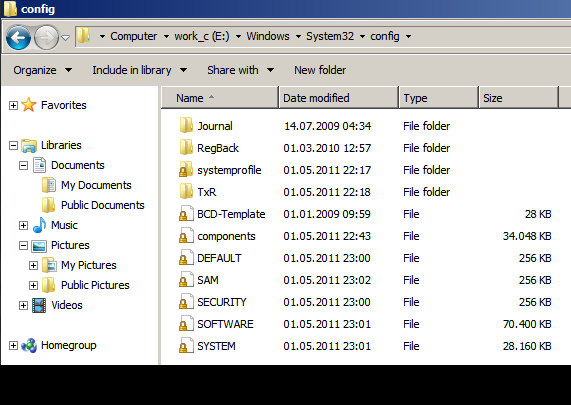
The system component Registry data files (Sam, Security, Software, System) are hidden inside this folder: C:\Windows\System32\Config\
The first user component (Ntuser.dat) of the Registry is hidden inside this folder: C:\Users\YourUserName\ (e.g. c:\Users\Martin\).
In Windows 7, Vista, Windows 8.1 and Windows 10.
The second user component (Usrclass.dat) of the Registry is hidden inside this folder: C:\Users\YourUserName\AppData\Local\Microsoft\Windows\
In Windows XP, Server 2003 and 2000.
The second user component (Usrclass.dat) of the Registry is hidden inside this folder: C:\Users\YourUserName\Local Settings\Application Data\Microsoft\Windows\
How to backup the Windows Registry.
The hard way
Since the Registry files are hidden from the user, you must access your hard drive or solid state drive from another Windows installation (so that Windows is loaded from another hard drive). Take your hard drive or SSD out of your computer and put it in an external USB or eSATA case. If you now connect the drive to another computer (e.g, a notebook) and browse to the folders where the Registry files are located (see the above section), they will become visible and you can copy them.
The easy way
In all Windows versions.
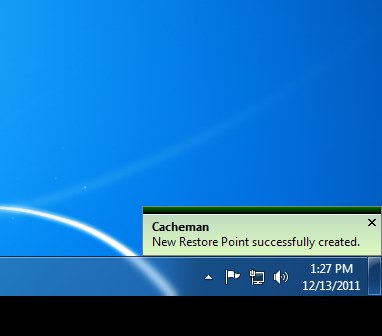
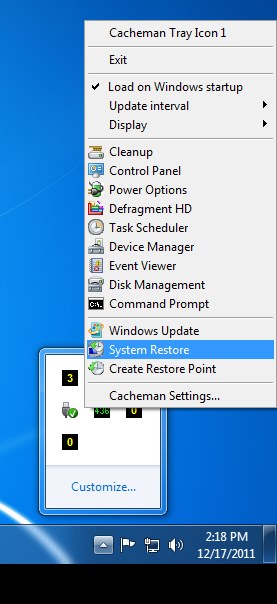
With Outertech's Cacheman utility you can right-click a Cacheman tray icon and select Create Restore Point, which includes a full Registry backup. After few seconds, Cacheman will create a copy of your Registry files. Alternatively you can go to Backups section of the Cacheman configuration window, and click on the Create Restore Point button there.


If you don't want to use Cacheman, you can still make a Registry backup:
In Windows 7, Vista, Windows 8.1 and Windows 10.
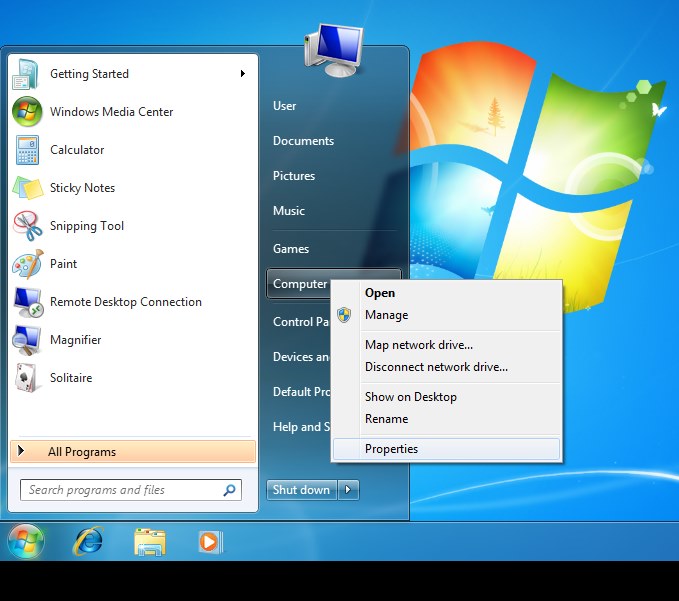
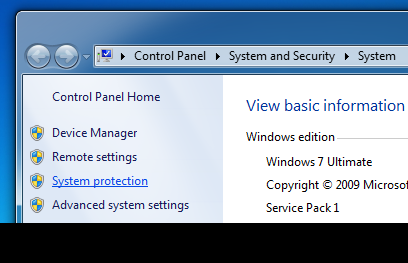
You can create a new Restore Point (which includes a full Registry backup) by going to the Windows Start Menu, right-clicking on Computer, selecting Properties from the menu, clicking on the System Protection label, and clicking on the Create button in the new window that opens, and entering a backup name.


In Windows XP, Server 2003 and 2000.
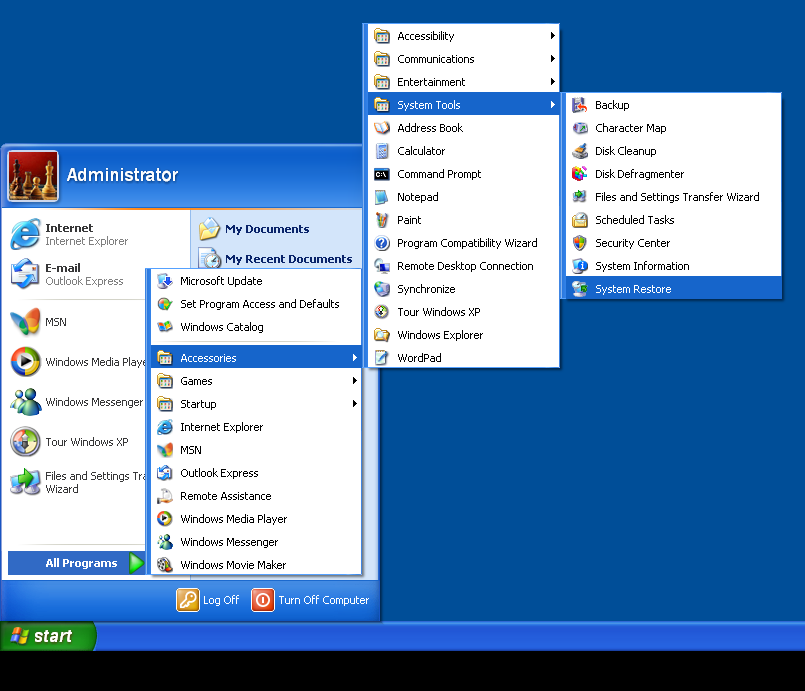
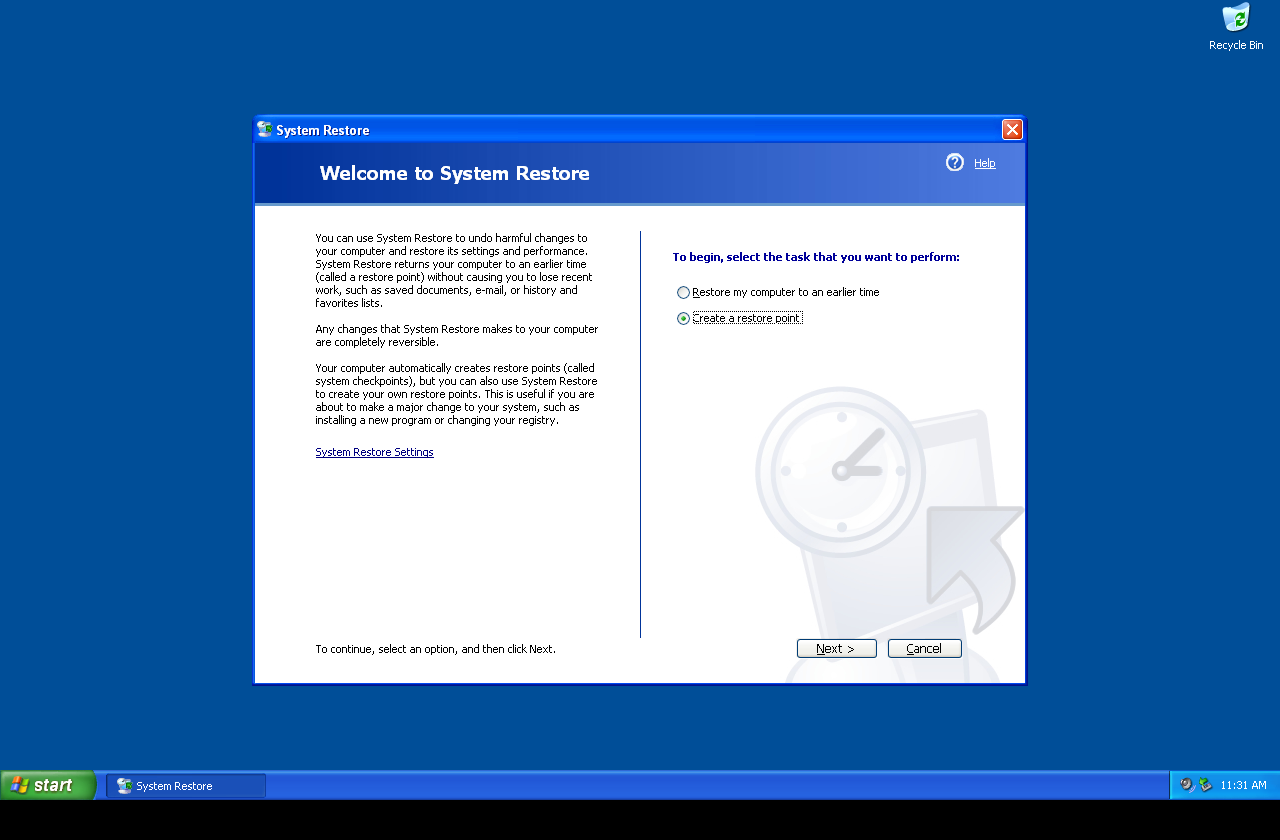
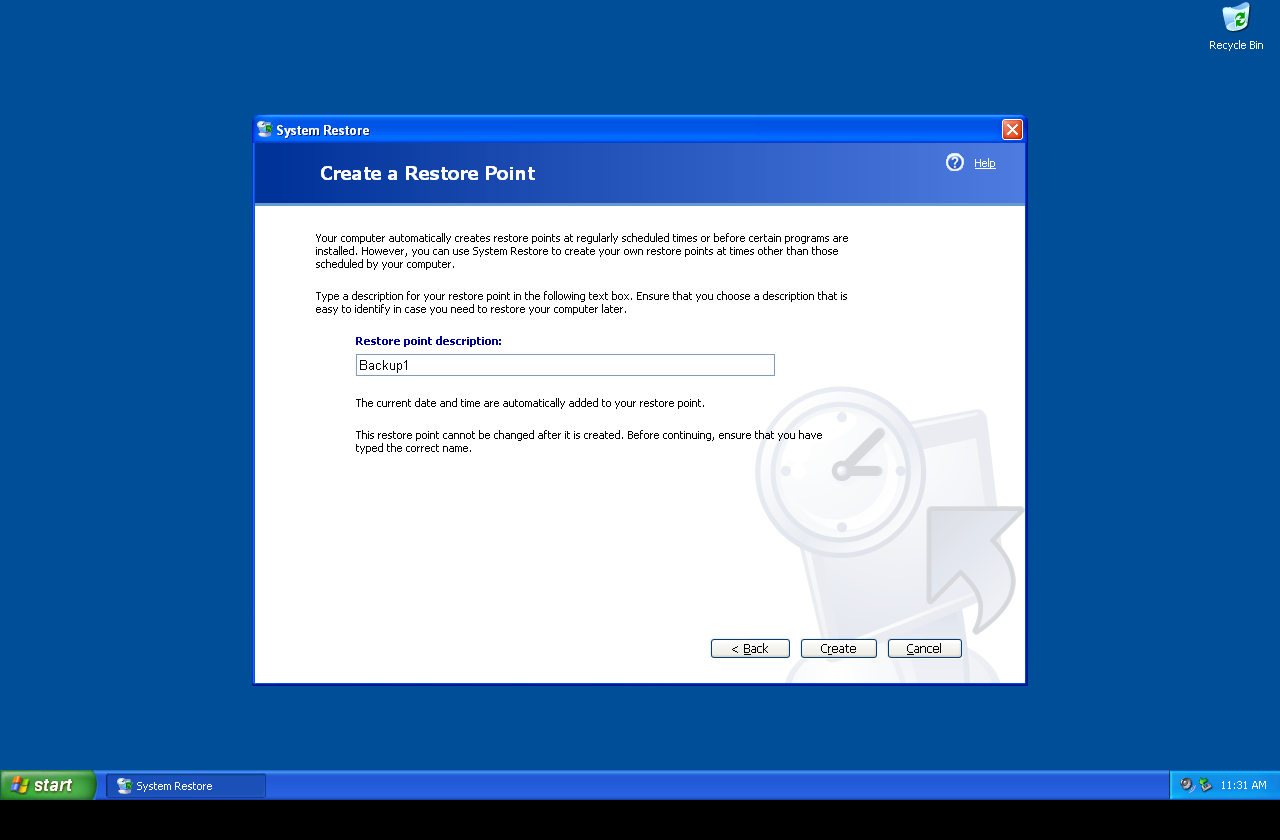
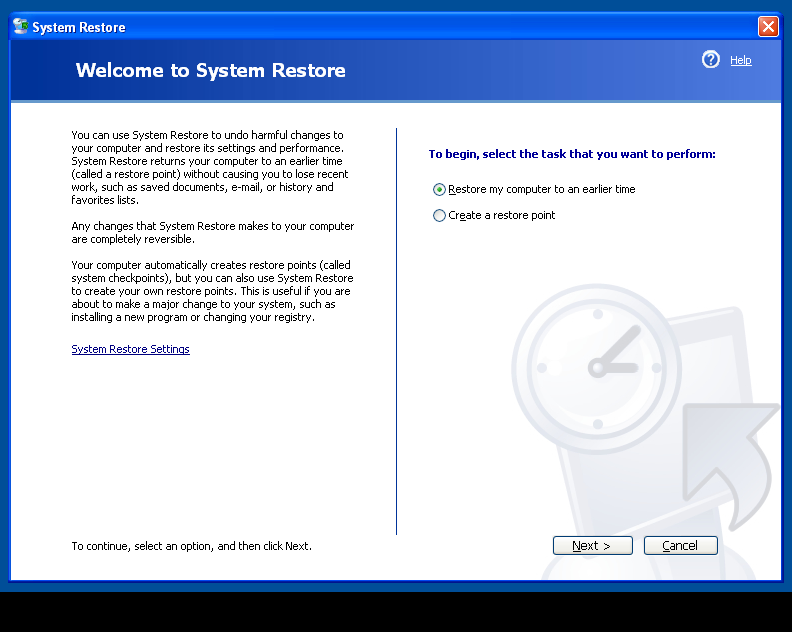
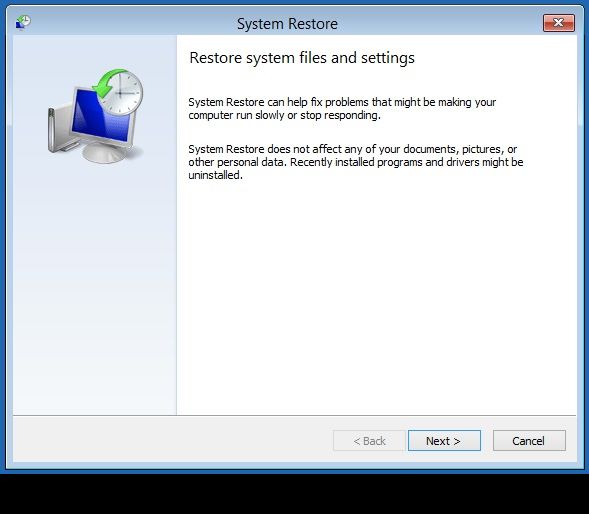
You can create a new Restore Point (which includes a full Registry backup) by going to the Windows Start Menu, clicking on All Programs, selecting Accessories | System Tools | System Restore. A new window will open where you should select Create a restore point, click Next, give it a name of your choosing and click Create.
How to restore a Windows Registry backup.
If you have a backup copy of your Registry, you can restore an old configuration in the event that something goes wrong after you or an application changes the Registry.
Case A. If you copied the Registry data files manually by booting from an alternate Windows installation.
Just boot up the other Windows installation (on another hard drive or another computer), attach the hard drive with the faulty Registry files, and replace them with the backup copy you made of the intact Registry files.
Case B1. If you have created a Registry backup using Cacheman and can still boot into your Windows Desktop.
In all Windows versions.
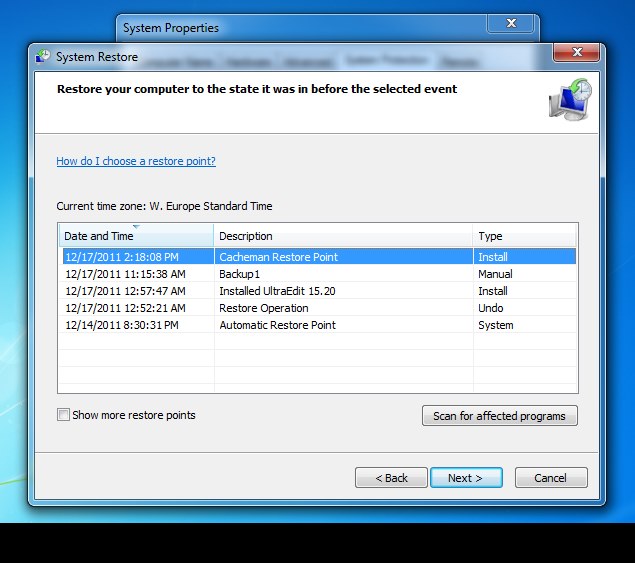
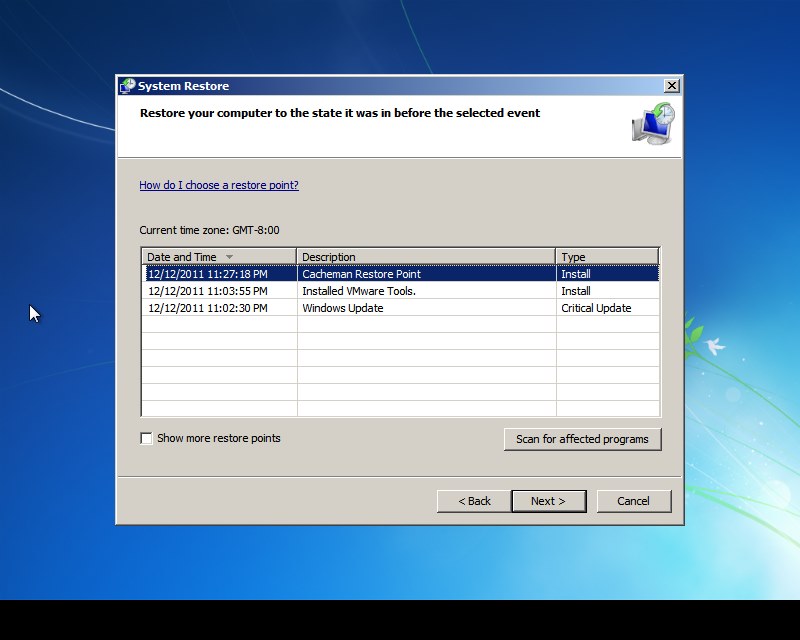
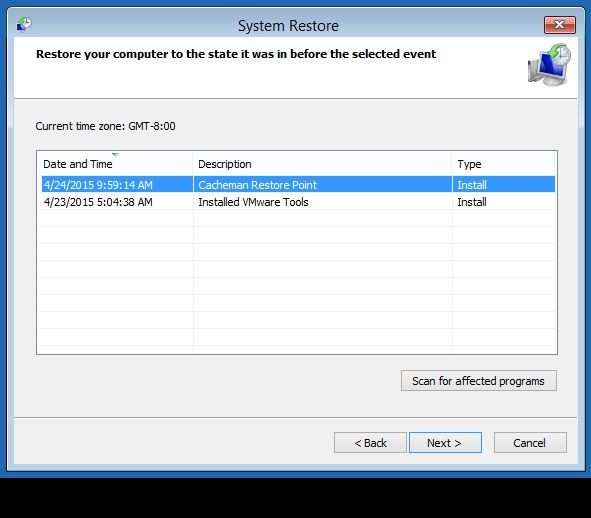
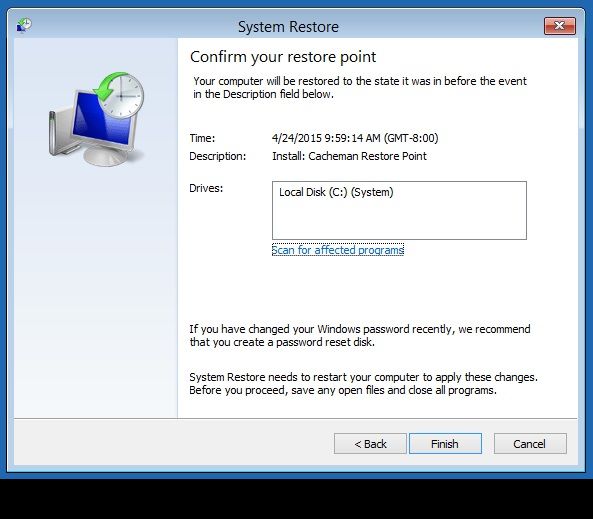
Right-click on a Cacheman tray icon and select System Restore. In the new window, click on Choose a different restore point, and then on the Next button. From the resulting list, select Cacheman Restore Point and hit Next again. Windows will reboot and restore the Registry and application files you had at the time you've created the backup. Your user data (.doc, .jpg files, etc.) will be not touched. You can perform the same operation in the Cacheman settings window (Backups tab).

Case B2. If you don't have Cacheman and have created the backup using System Protection dialog.
In Windows 7, Vista and Windows 8.
Go to the Windows Start Menu, right click on Computer, select Properties from the menu, and click on the System Protection label. In the new window that opens, click on the System Restore button. From the resulting list, select the backup with the name you've created before and hit Next. Windows will reboot and restore the Registry and application files you had at the time you've created your backup. Your user data (.doc, .jpg files, etc.) will be untouched.
In Windows XP, Server 2003 and 2000.
Go to the Windows Start Menu, click on All Programs, select Accessories | System Tools | System Restore. A new window will open. Select Restore my computer to an earlier time, click Next, select the backup with the name you have created before, and hit Next again. Windows will reboot and restore the Registry and application files you had at the time of the backup creation. Your user data (.doc, .jpg files, etc.) will not be touched.

Case C. If you cannot boot into your Windows Desktop and are getting an error message that you think is Registry related.
In Windows 7 and Vista.
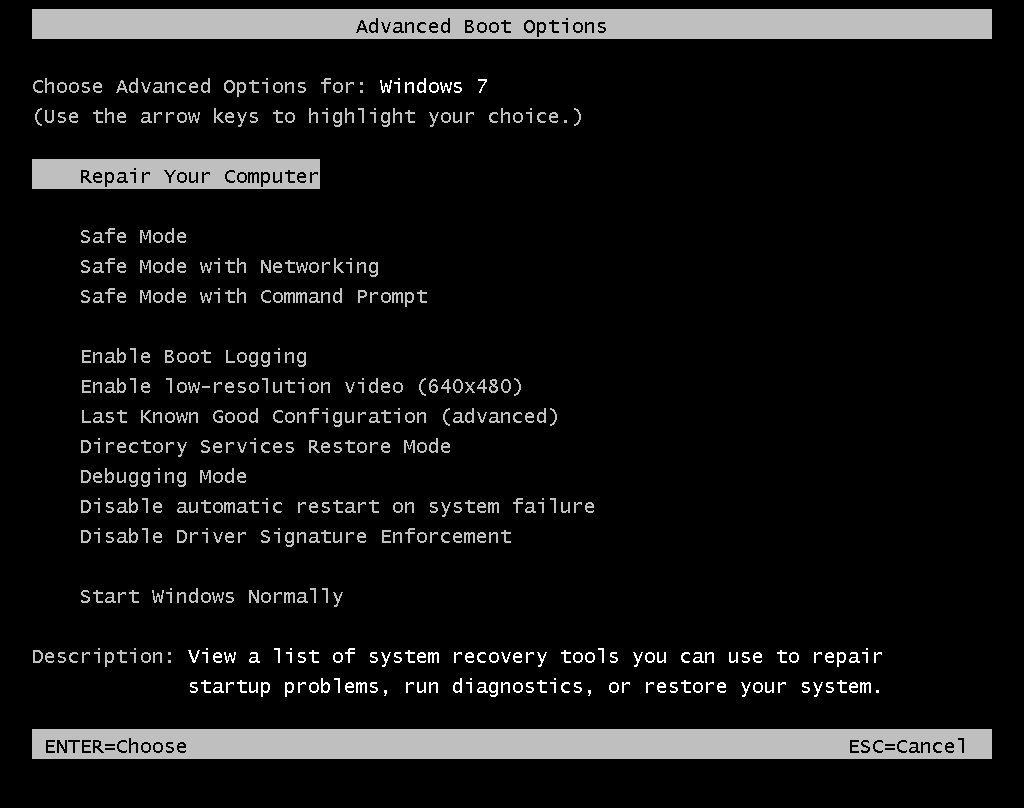
Turn on your computer. You must hit the F8 key early in the boot process to make the Windows boot menu display. If you don't know the exact time when the F8 key needs to be pressed, just keep hitting the F8 key as the computer boots until the boot menu (screenshot below) shows up.
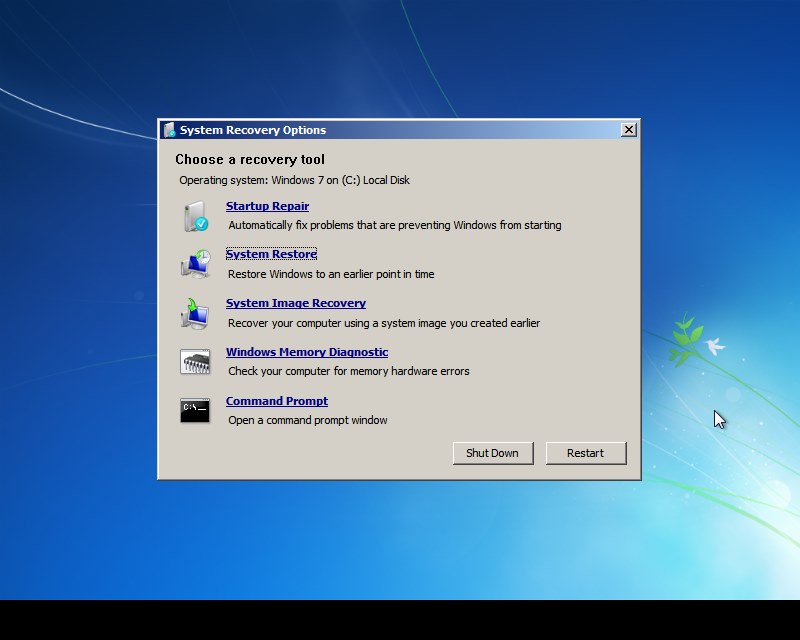
Make sure Repair my computer is selected, and hit Enter. About a minute later you may be asked about your keyboard layout (click on Next) and user password (enter your password, or if you don't have one, click Next). When the System Recovery Options window shows up, click on System Restore, select the Cacheman Restore Point (if you don't have Cacheman choose the restore point you've created manually) and click Next. The computer will restart, and the Registry and application files you had at the time you've created your backup will be restored. Your user data (.doc, .jpg files, etc.) will not be touched.
In Windows 8 and Windows 8.1.
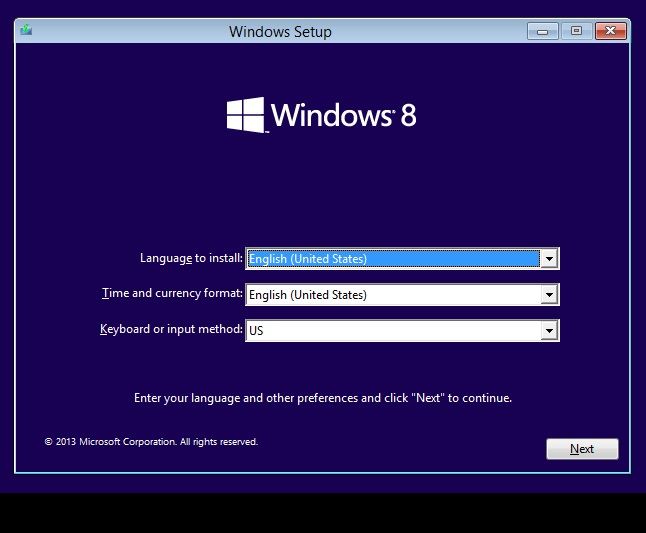
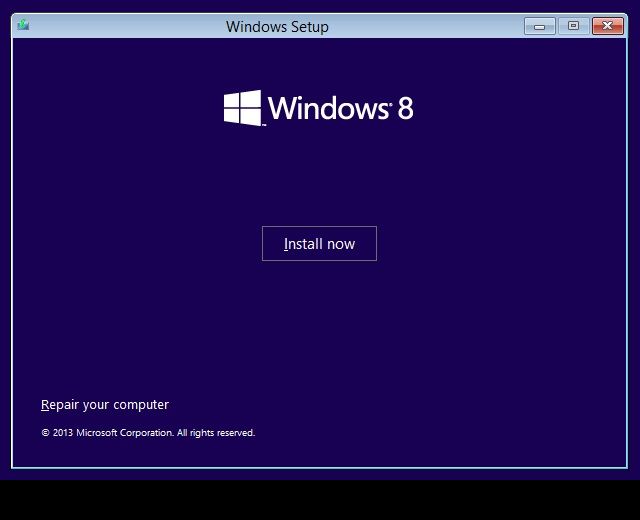
Microsoft has removed the boot menu from Windows 8 for unknown reasons. Probably out of spite. There are reports that it's still there, and you can smash F8 or Shift + F8 during boot to get it displayed, but in our testing this was not possible on any of our computers. If you manage to get to this menu, select Troubleshoot | Advanced options | System Restore and choose the Cacheman Restore point. Otherwise you will need a Windows 8 installation medium (DVD or USB stick) to access system restore. If you boot from the Windows 8.x installation medium (DVD or a USB stick) you will be asked about your language. Click Next. In the following screen DON'T click on Install now. Select Repair my computer instead.
In the next three screens choose Troubleshoot | Advanced options | System Restore | Windows 8.x. System Restore will launch.


Select the Cacheman Restore Point (if you don't have Cacheman choose the restore point you've created manually) and click Next followed by Finish. The computer will restart, and the Registry and application files you had at the time you've created your backup will be restored. Your user data (.doc, .jpg files, etc.) will not be touched.
In Windows XP, Server 2003 and 2000.
Turn on your computer. You must hit the F8 key early in the boot process to make the Windows boot menu display. If you don't know the exact time when the F8 key needs to be pressed, just keep hitting the F8 key as the computer boots until the boot menu (screenshot below) shows up.

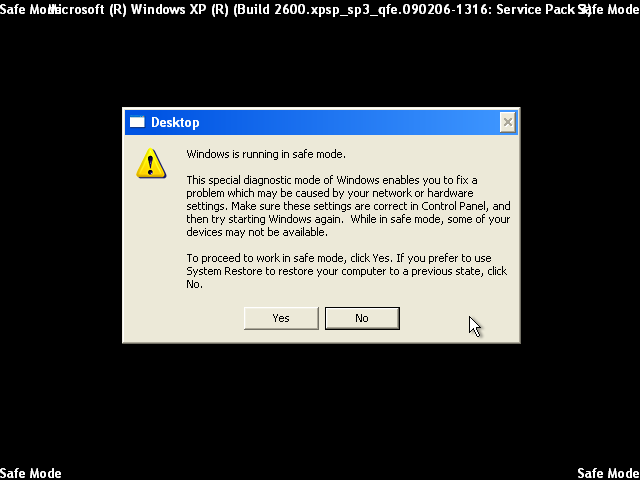

Select Safe Mode from the boot menu and hit Enter. After a while the safe mode dialog will show up. Click on No. In the new window select Restore my computer to an earlier time, click Next, select the backup with the name you have created before, and hit Next again. Windows will reboot and restore the Registry and application files you had at the time you've created your backup. Your user data (.doc, .jpg files, etc.) will not be touched.
How to edit the Windows Registry.
What is the structure of the Windows Registry?
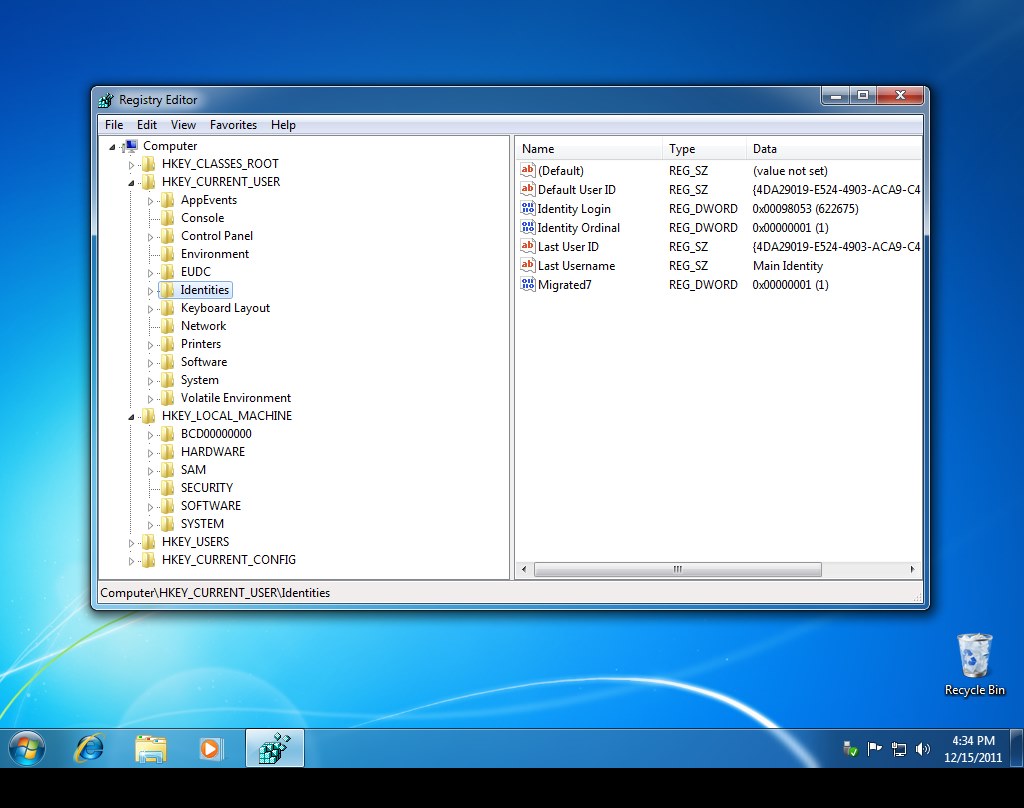 The Windows Registry consist of several sections called hives, which are arranged in a tree-like hierarchical structure.
The hives (for example HKEY_LOCAL_MACHINE) are comparable to the partitions on a hard drive (C:\, D:\ and so on).
A hive contains multiple keys (for example HKEY_LOCAL_MACHINE\SOFTWARE). Keys are comparable to the folders (for example C:\Windows) on your hard drive.
A key can contain multiple values of different type; these are comparable to the files on your hard drive. Every value can contain data including numbers, text, or binary data.
The following hives are present on Windows 7 | 8, Vista, XP, 2003 Server and 2000.
HKEY_CLASSES_ROOT (short HKCR)
This hive consists of file association configurations. It is a virtual hive that links to keys in two other hives, HKEY_CURRENT_USER\Software\Classes and HKEY_LOCAL_MACHINE\Software\Classes.
HKEY_CURRENT_USER (short HKCU)
Contains desktop settings, application settings, and file association configurations of the currently logged in user.
HKEY_LOCAL_MACHINE (short HKLM)
Contains system settings, device driver data, system services configurations, boot options, and application data that apply to all users (not only the currently logged-in user) of a Windows computer.
HKEY_USERS (short HKU)
This is a virtual hive that links to different sets of HKEY_CURRENT_USER hives (one for each user of the Windows installation).
HKEY_CURRENT_CONFIG (short HKCC)
This hive is only created during boot time and not stored on the hard drive. It's a virtual link (like a copy) to the \System\CurrentControlSet\Hardware Profiles\Current key of the HKEY_LOCAL_MACHINE hive.
What types of data does the Windows Registry contain?
Like normal files, which can contain different data types (like .jpg or .docx), the values in a Windows Registry key can take different types of data:
String Value (REG_SZ): Basically normal text, either ASCII or Unicode. Most common data type.
Binary Value (REG_BINARY): Binary means that the value can contain any type of computer data, up to a maximum value size of 16 KBytes. The data must be entered using hexadecimal digits (00-FF). This type is used mostly by device drivers.
 DWORD (32-bit) Value (REG_DWORD): A number between 0 and 232 (4294967296).
QWORD (64-bit) Value (REG_QWORD): A number between 0 and 264.
Multi-String Value (REG_MULTI_SZ): A text list of multiple strings with an additional null character on the end. Imagine it as multiple sets of the String Value type, put into a single value.
Expandable String Value (REG_EXPAND_SZ): A text string that can contain an environment variable (such as %TEMP% or %PATH%). Environment variables are name aliases for Windows system properties. For example, the %TEMP% environment variable contains the location in which applications place temporary files.
How to change a setting in the Windows Registry.
The simplest way to edit the Windows Registry is to use the Registry Editor, as in the following examples.
Example 1: Removing " - Shortcut" text from new Desktop shortcuts.

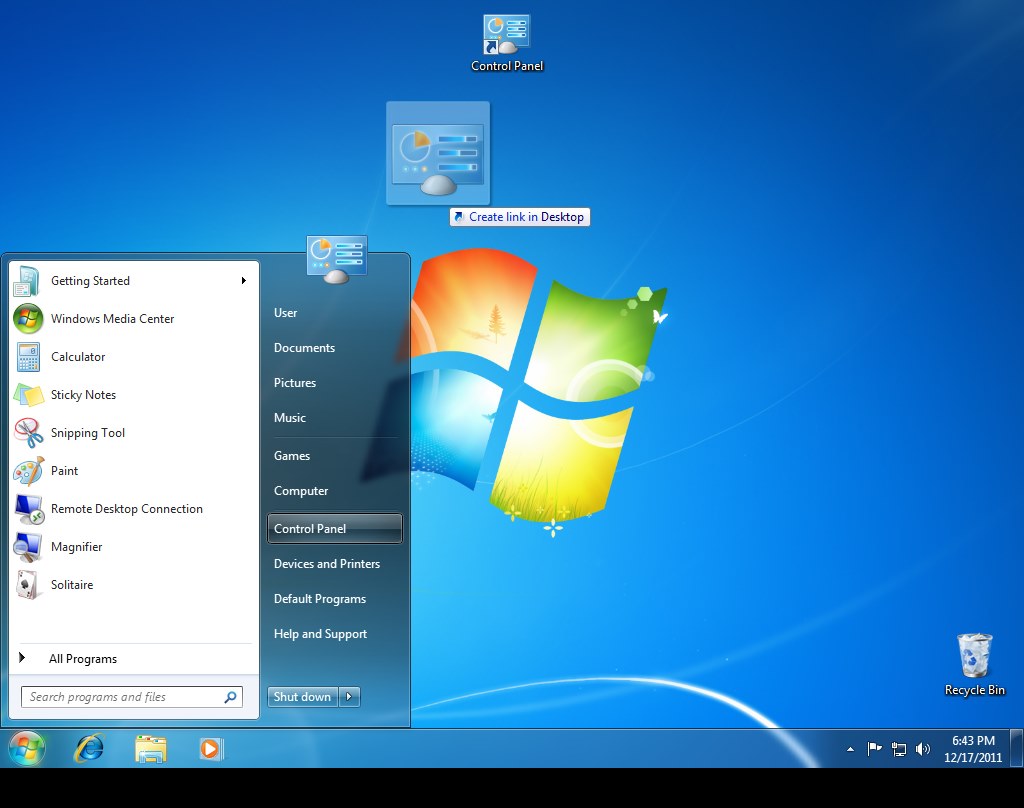 When you create a shortcut on your Desktop, Windows adds the text " - Shortcut" to it. For example, if you drag and drop the Control Panel label from the Start Menu to your Desktop, Windows will create a shortcut called "Control Panel - Shortcut."
Some users don't like this addition and prefer just "Control Panel" instead, so they have to rename their shortcuts immediately after they create them. But you can change a value in the Windows Registry such that Windows will create all new shortcuts without the "- Shortcut" termination. A new shortcut will appear as "Control Panel" right away, without having to have the extra text removed.
The editing process step by step.
Make sure that you have a backup of the Registry before attempting to make any changes to it.
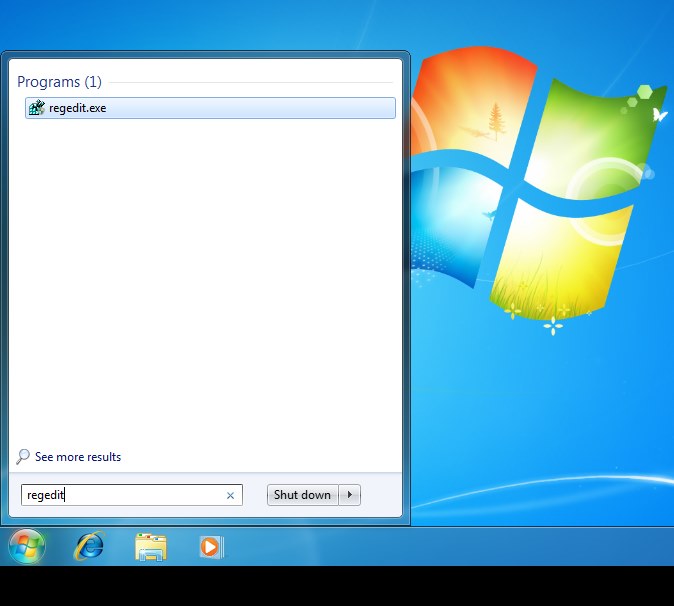
Go to the Start Menu, type Regedit, and hit Enter. If a User Account Control security question shows up, answer with Yes.
On the left side of the Registry Editor screen you can browse all the different hives and keys of the Windows Registry. On the right side, you will see their current corresponding values.
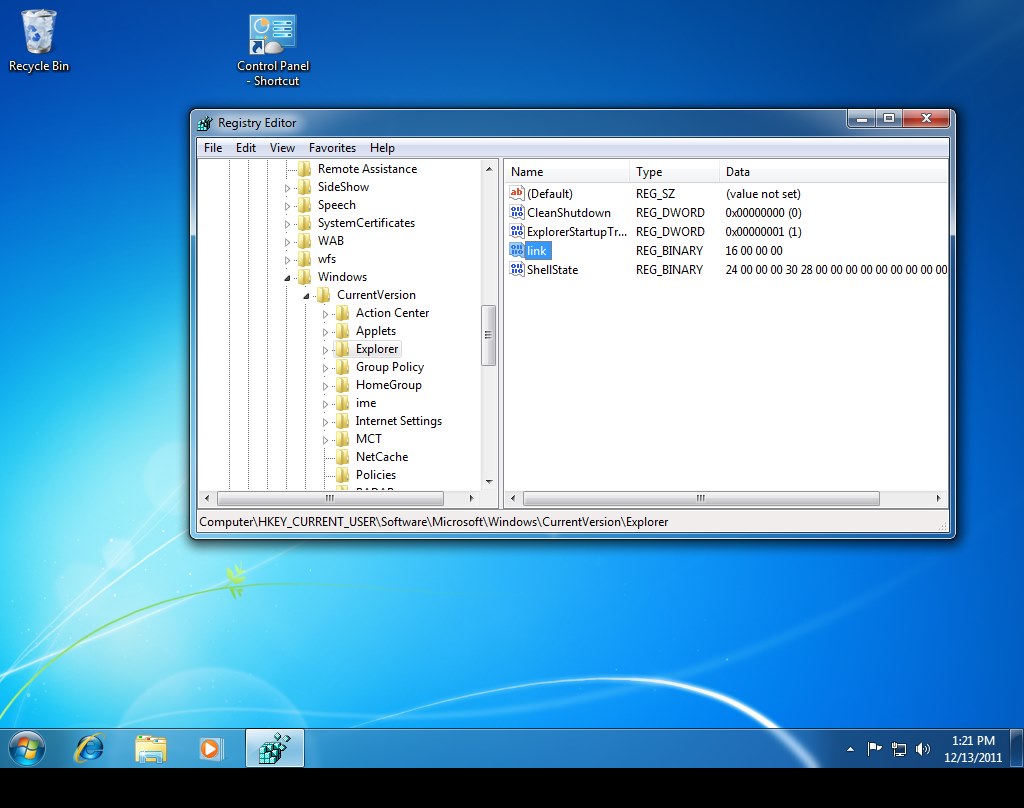
Now browse to this key: HKEY_CURRENT_USER\Software\Microsoft\Windows\CurrentVersion\Explorer
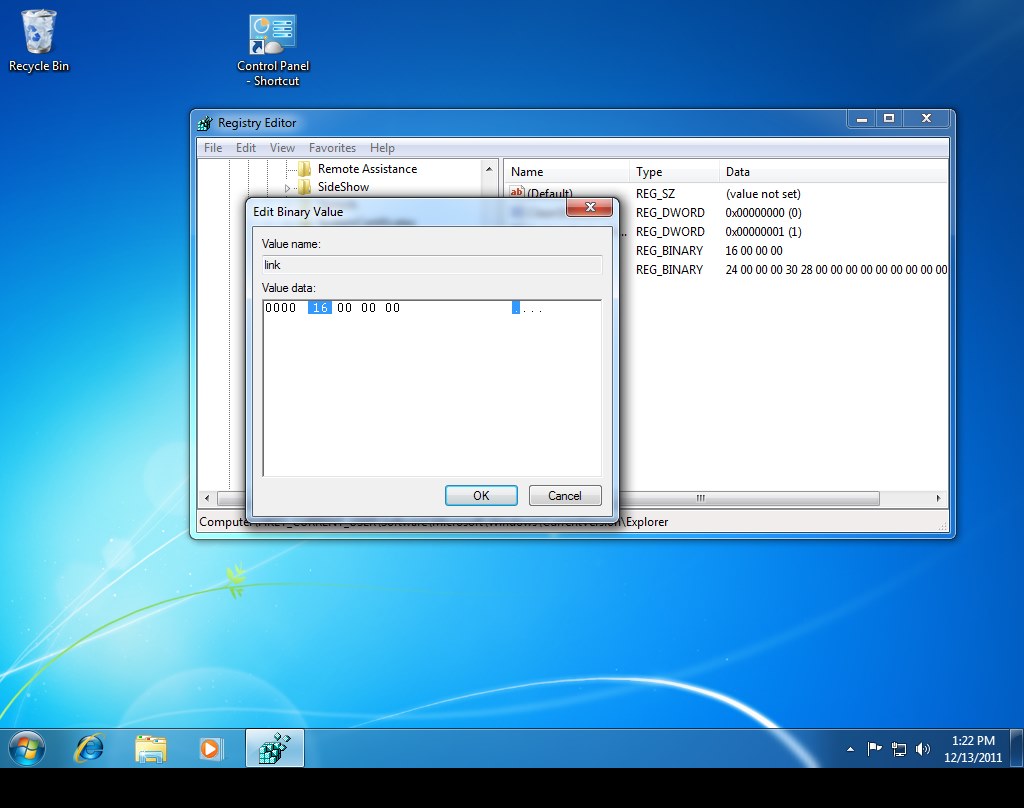
Double-click the link value on the right side. Mark the number 16 by selecting it with the mouse, and type 00 (two zeros) to replace the 16 with 00. The link value now reads 00. Click OK and close the Registry Editor.
Reboot your computer. Your existing shortcuts will not have changed, but the new ones you create will not have the " - Shortcut" text added to them. (Test this by deleting the old "Control Panel - Shortcut" shortcut and creating a new one).
If you don't want to mess around with the Registry directly, you can achieve the same result with Cacheman, by going to the Usability Tweaks tab and unchecking the Shortcut text checkbox.

How to create a new setting in the Windows Registry.
Creating new Registry keys and values is something unusual. But if you want to change certain Windows behaviour, apply some tweaks to make the computer faster or add new functionality, it may be necessary.
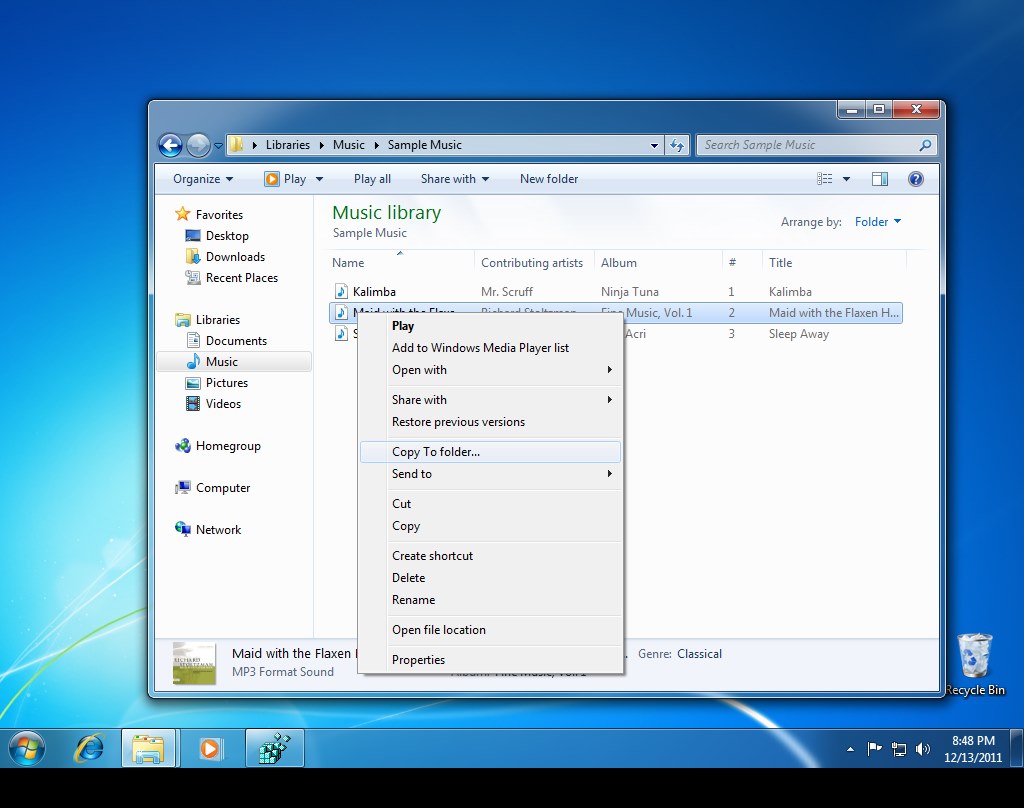
Example 2: Adding new Copy to folder... option to Explorer's right-click context menu.
 Make sure you have a Registry backup before making any changes to your Registry.
Go to the Start Menu, type Regedit, and hit Enter. If a User Account Control security question shows up, answer with Yes.
On the left side of the Registry window, you can browse all the different hives and keys. On the right side, you can see the corresponding values.
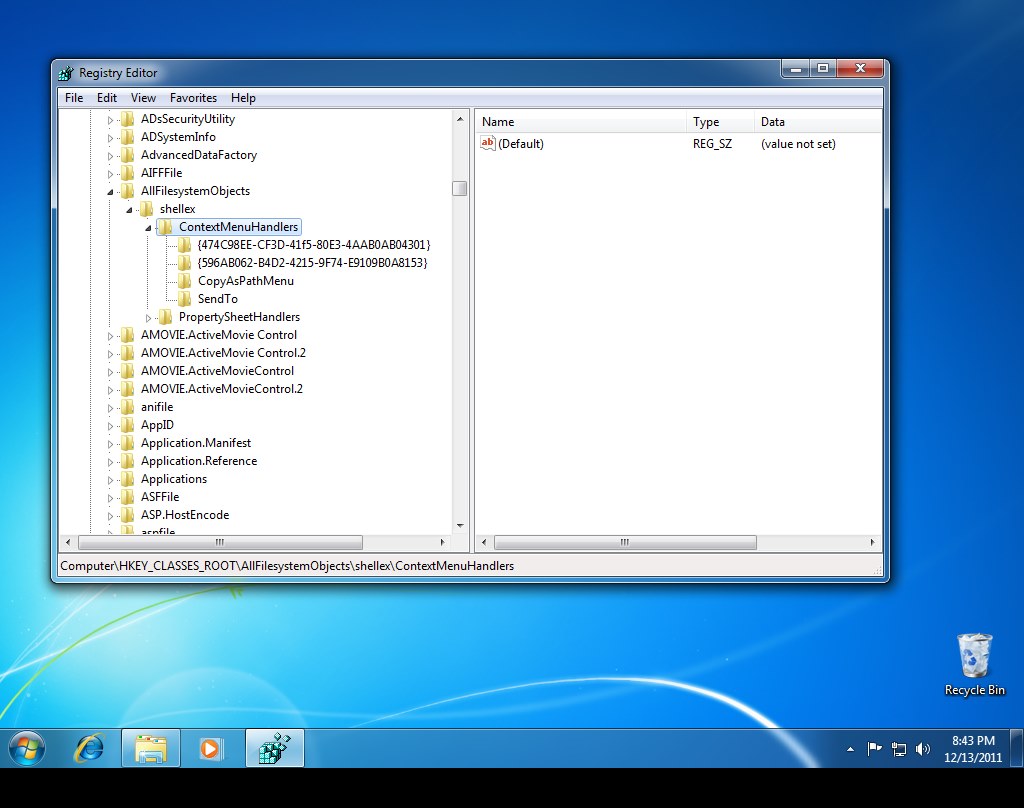
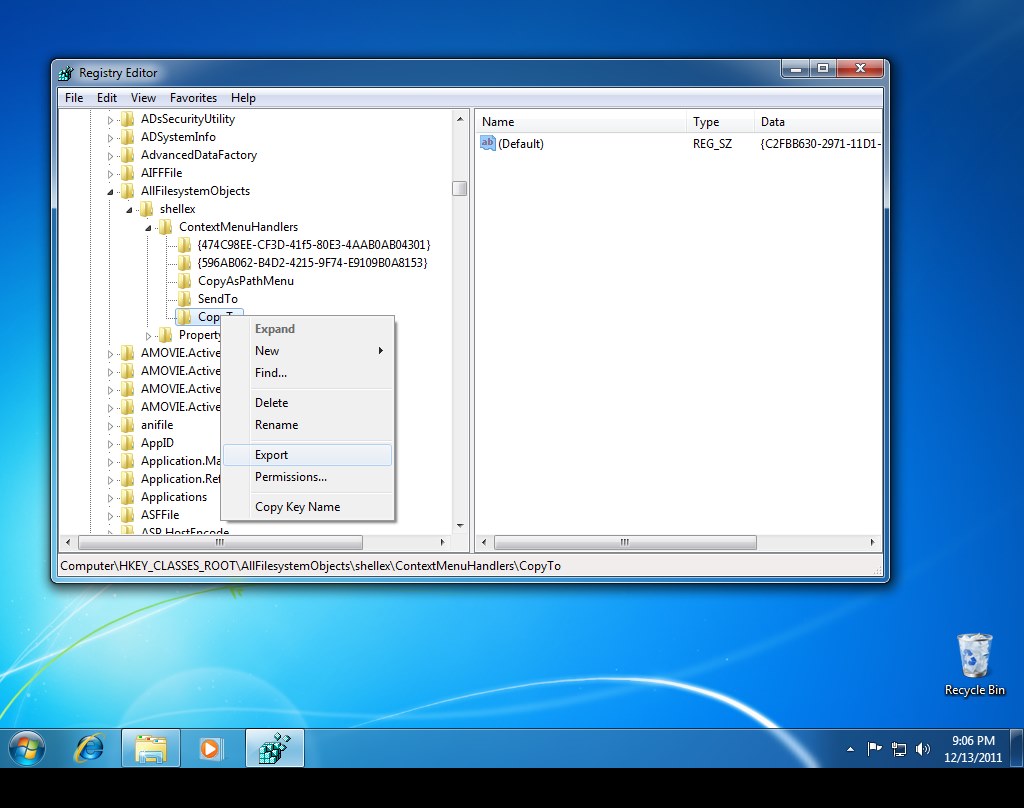
Now browse to this key: HKEY_CLASSES_ROOT\AllFilesystemObjects\shellex\ContextMenuHandlers
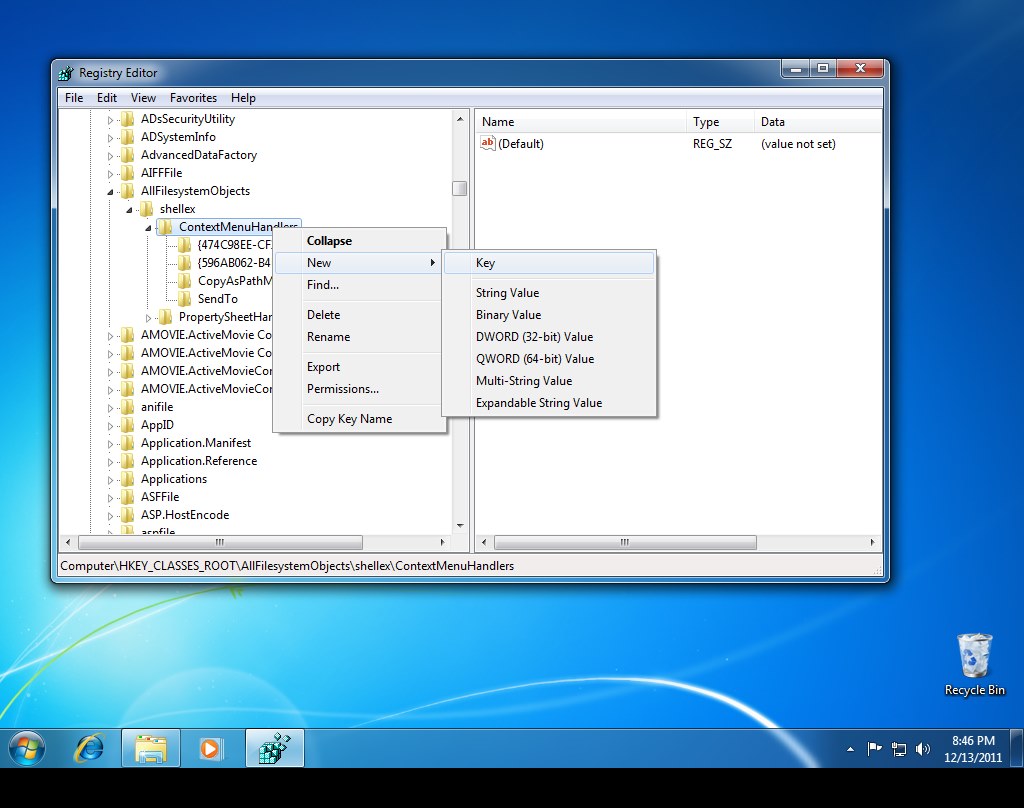
Right-click on ContextMenuHandlers and select New -> Key from the menu.
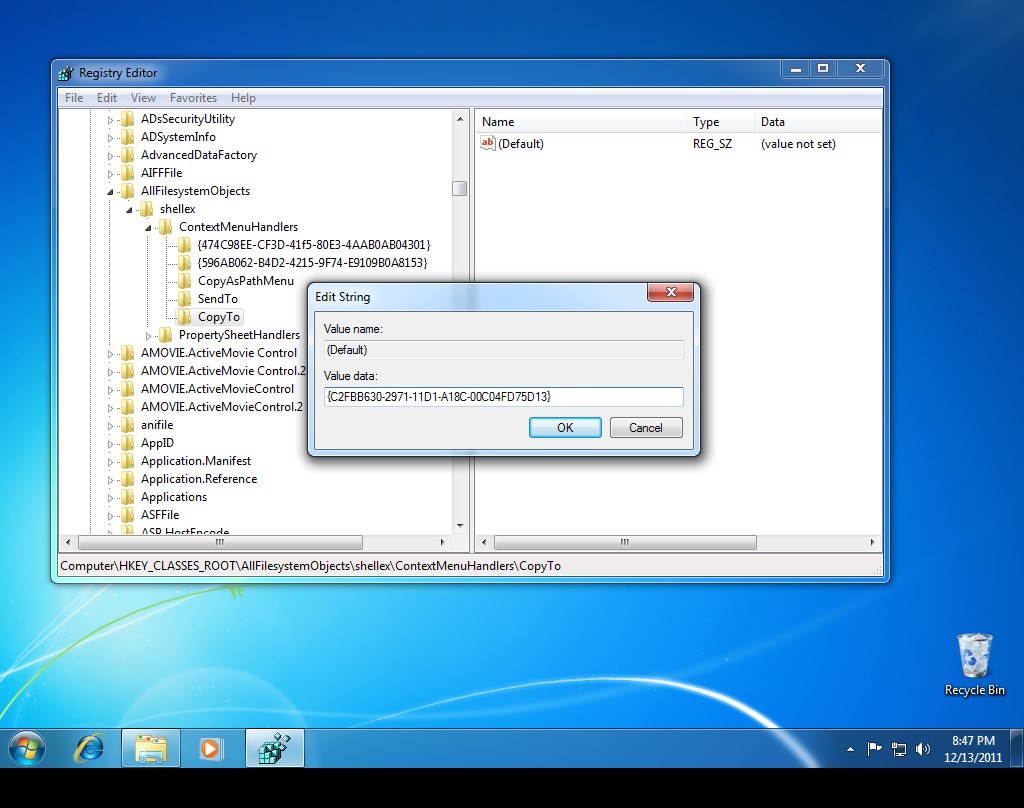
Enter CopyTo as key name.
Double-click the (Default) value on the right side to edit it. Enter the text {C2FBB630-2971-11D1-A18C-00C04FD75D13} (you can use copy and paste for this). Close the Registry Editor.
From now on, if you right-click a file in Explorer, you will see the option to copy it to a different folder.
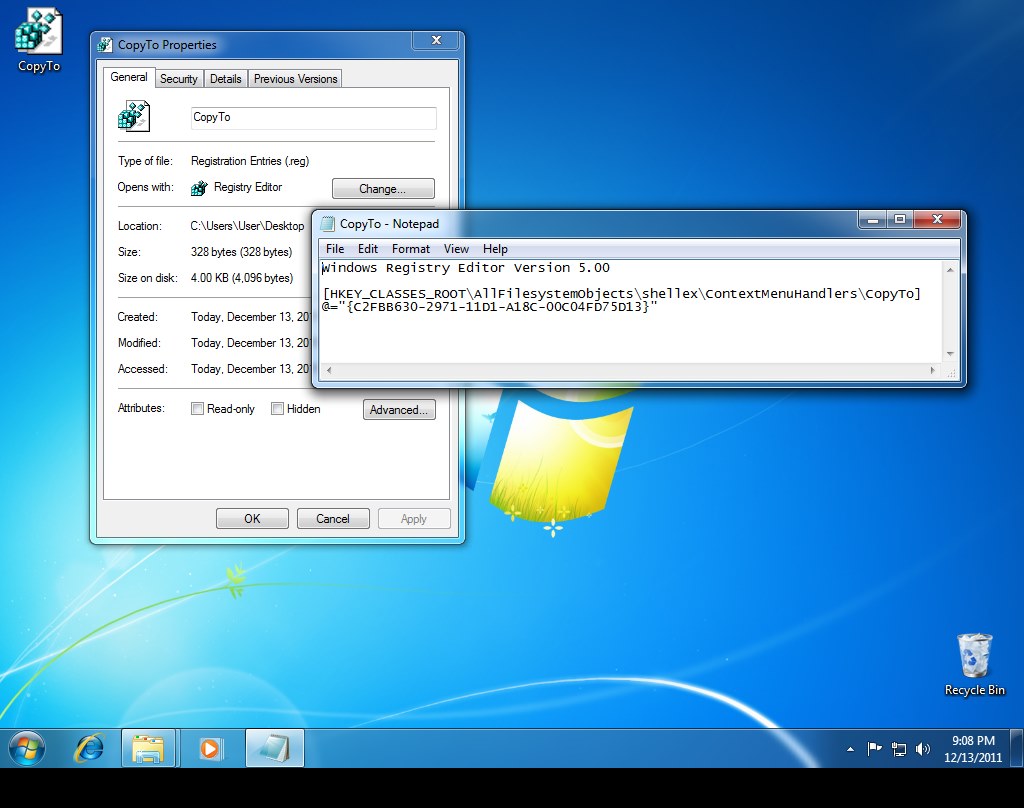
What are .reg files?
.Reg files are special text files that include commands for modifying the Windows Registry. They are scripts that can apply specific tweaks to the Registry with a simple double-click, bypassing manual editing using the Registry Editor. These files can be very dangerous. A malicious .reg file can make your Windows installation unworkable or worse. Use a .reg file only if you completely trust the source you have received it from, and be certain that you have a backup of your Registry. It's also a good idea to open a .reg file with a text editor like Notepad or GetDiz before using it, to get an idea what the .reg script is going to do. You can create .reg files yourself by using the export function of the Registry Editor.
How to export and import parts of the Windows Registry?
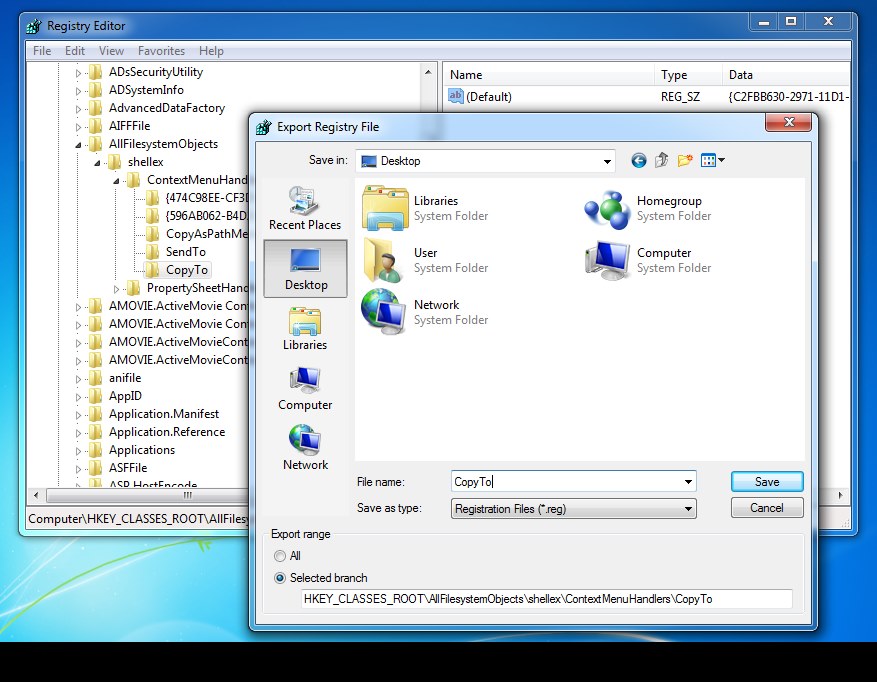
Exporting a Registry key is necessary if you want to copy a specific setting or the configuration of an application (located in HKEY_CURRENT_USER\Software and HKEY_LOCAL_MACHINE\Software) to another computer.
To export a Windows Registry key, right-click it and select Export. Give it a name -- for example, CopyTo. The Registry Editor will create a file called CopyTo.reg, a text file that can be viewed or edited with a text editor like Notepad or GetDiz.
To import the content of the exported .reg file to the Registry on another Windows computer, just double-click on it. You will be asked if you want to import it to the Windows Registry.
Other frequently asked questions about the Windows Registry.
What is Windows Registry optimization?
Windows Registry optimization refers to tweaking of Registry database values to increase performance and to make the computer faster, or to change the usability of Windows. Optimization can be done either manually (RegEdit) or automatically (by means of .reg script files or optimization applications like Cacheman).
What is Windows Registry Scareware?
Windows Registry scareware refers to web sites or program applications that pretend to have found Registry errors, and offer fake solutions for them. Usually an alarming warning accompanies an offer to fix the fictional problem (which does not exist).
Registry errors are not uncommon, but in most cases they are harmless. When they are serious, however, they can hamper Windows functionality or even prevent Windows from booting to Desktop. Solving serious Registry problems is not trivial, and usually cannot be done by the so-called "Registry Cleaners". If you run into such a problem try using Google to search for a solution, or consult a Windows expert.
How to use the command line to edit the Windows Registry?
To import .reg files to Registry: RegEdit.exe filename
To import .reg files silently (without a notification) to Registry: RegEdit.exe /s filename
To export the complete content of Registry to a .reg file: RegEdit.exe /e filename
To export a specific key: RegEdit.exe /e filename Keypath, e.g. RegEdit.exe /e Software.reg HKEY_LOCAL_MACHINE\Software
If your Registry question is still unaswered, you can contact us, and we will expand this tutorial.


Copyright (c) 1999-2024 Outertech. All Rights Reserved.